メイン画像とサムネイルを連動させて画像を切り替える
こんにちは、トシキです。
今回は、メイン画像とサムネイルを連動させて、画像を切り替える方法について解説します。
本記事の内容
スポンサードサーチ
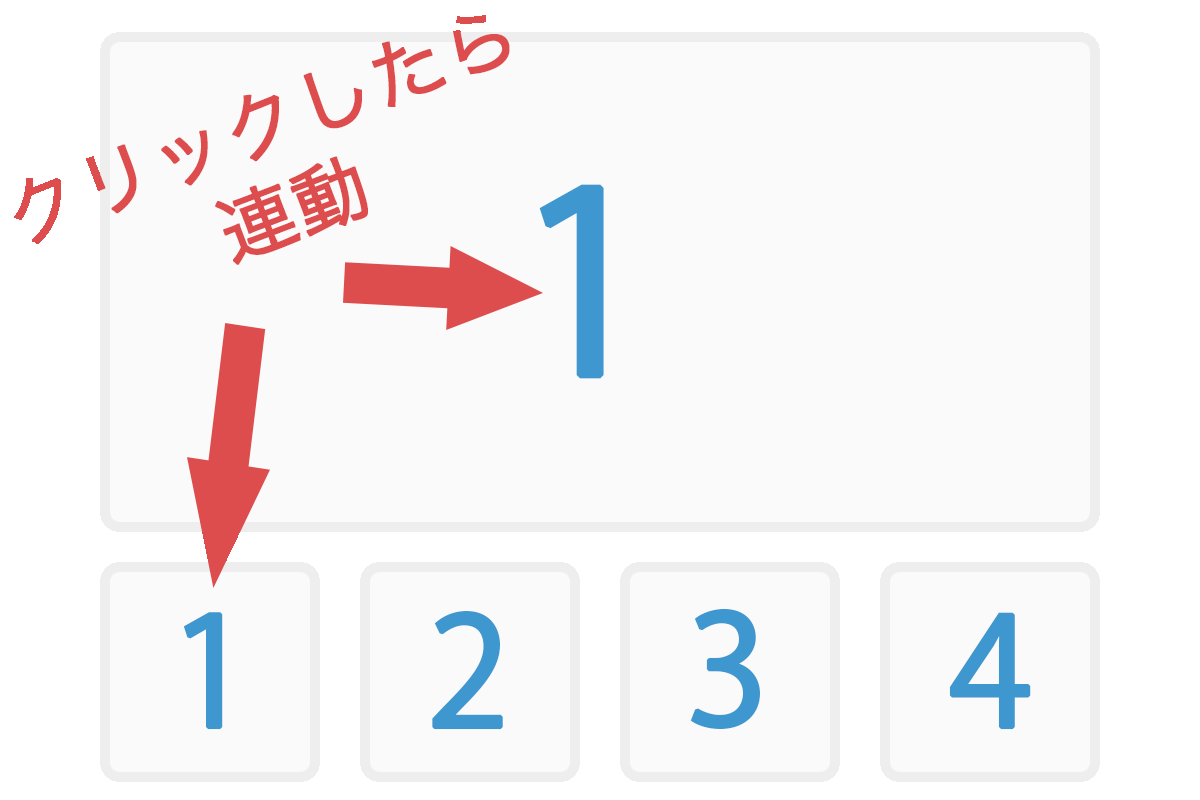
【1】メイン画像とサムネイルを連動させて画像を切り替える
メイン画像が上に1枚で、その下にサムネイルが並んでいるレイアウトになります。
See the Pen メイン画像とサムネイルを連動させて画像を切り替える by tosshii (@totototosshii) on CodePen.
1-1. HTML
<div class="bl_imgSwitcher" id="js_imgSwitcher">
  <div class="bl_imgSwitcher_main"><img src="https://blogger.googleusercontent.com/img/b/R29vZ2xl/AVvXsEju7U8esONERDN_s7GbaKtQbHoaZ9ogxlzbcSf9I8_JbyCrXUM9BvvFFg-1LwbMZHM2x-5pBYWxlhTSqPa_9eLwZeWY2ZzHhVg_iQqb0PRsSxP-WxElIjlm1BT1jy0fCRtHAckDbyCjdd-u/s1600/no_image_logo.png" alt="No Image" width="712" height="474"></div>
  <div class="bl_imgSwitcher_thumb">
    <button class="bl_imgSwitcher_btn" type="button"><img src="https://picsum.photos/id/229/1000/800" alt="ダミー01" width="160" height="160"></button>
    <button class="bl_imgSwitcher_btn" type="button"><img src="https://picsum.photos/id/230/800/1000" alt="ダミー02" width="160" height="160"></button>
    <button class="bl_imgSwitcher_btn" type="button"><img src="https://picsum.photos/id/231/1200/800" alt="ダミー03" width="160" height="160"></button>
    <button class="bl_imgSwitcher_btn" type="button"><img src="https://picsum.photos/id/232/800/1200" alt="ダミー04" width="160" height="160"></button>
    <button class="bl_imgSwitcher_btn" type="button"><img src="https://picsum.photos/id/235/1000/800" alt="ダミー05" width="160" height="160"></button>
    <button class="bl_imgSwitcher_btn" type="button"><img src="https://picsum.photos/id/236/800/1000" alt="ダミー06" width="160" height="160"></button>
  </div>
</div>メイン画像(.bl_imgSwitcher_main > img)には、ダミーのimgを用意します(画像はいらすとやから借りました)。srcが空だとHTML構文エラーになるため、ダミー用のsrcは用意してください。
各サムネイルのimgは、<button class="bl_imgSwitcher_btn" type="button">で囲んでいます(画像はLorem Picsumから借りました)。
1-2. CSS
:root {
  --overlay-color: rgb(75 86 89/.5);
}

/* ラッパー */
.bl_imgSwitcher {
  inline-size: min(100%, 712px);
  margin-inline: auto;
  margin-block: 3rem;
}

/* メイン画像 */
.bl_imgSwitcher_main img {
  aspect-ratio: 3/2;
  inline-size: 100%;
  object-fit: cover;
  border-radius: 20px;
  transition: opacity .4s cubic-bezier(.25, 1, .5, 1);
}

/* サムネイルのエリア */
.bl_imgSwitcher_thumb {
  display: flex;
  gap: 0 1.5rem;
  margin-block-start: 2rem;
  overflow-x: scroll;
}

/* サムネイルの各ボタン */
.bl_imgSwitcher_btn {
  flex-shrink: 0;
  inline-size: 10rem;
  overflow: hidden;
  border-radius: 20px;
  position: relative;

  &::before {
    content: "";
    border-radius: inherit;
    position: absolute;
    inset: 0;
    z-index: 10;
    transition: background-color .4s;
  }

  &:focus-visible::before {
    background-color: var(--overlay-color);
  }

  img {
    aspect-ratio: 1;
    inline-size: 100%;
    object-fit: cover;
  }
}

@media (any-hover: hover) {
  .bl_imgSwitcher_btn:hover::before {
    background-color: var(--overlay-color);
  }
}

/* is_activeクラスが付与されたら、サムネイルに半透明の黒背景を適用 */
.bl_imgSwitcher_btn.is_active::before {
  background-color: var(--overlay-color);
}
サムネイルの枚数が増えたらスクロールできるように、.bl_imgSwitcher_thumbにoverflow-x: scroll;を指定。
現在選択されているサムネイル(<button class="bl_imgSwitcher_btn" type="button">)には、.is_activeクラスを付与して擬似要素に半透明の黒背景を適用しています。
また、ホバーとフォーカス時にも同様のスタイルを指定しています。
1-3. JavaScript
window.addEventListener('DOMContentLoaded', () => {
  const imgSwitcher = document.getElementById('js_imgSwitcher');
  if (imgSwitcher) {
    const mainImg = document.querySelector('.bl_imgSwitcher_main img');
    const thumbBtns = document.querySelectorAll('.bl_imgSwitcher_btn');

    // 初期設定(最初のサムネイルをメイン画像にセット)
    mainImg.src = thumbBtns[0].querySelector('img').src;
    mainImg.alt = thumbBtns[0].querySelector('img').alt;
    thumbBtns[0].classList.add('is_active');

    // サムネイルを選択した時の処理
    thumbBtns.forEach(thumbBtn => {
      thumbBtn.addEventListener('click', switchImage);
      thumbBtn.addEventListener('focus', switchImage);
    });

    /**
     * メイン画像を選択したサムネイル画像に切り替える関数
     * - メイン画像をフェードアウト
     * - 0.1秒待機してsrcとaltを変更
     * - メイン画像をフェードイン
     * - is_activeクラスを更新
     */
    async function switchImage() {
      const img = this.querySelector('img');

      // メイン画像と同じサムネイルが選択された場合は何もしない
      if (mainImg.getAttribute('src') === img.getAttribute('src')) return;

      // メイン画像をフェードアウト
      mainImg.style.opacity = 0;

      // 0.1秒待機
      await new Promise(resolve => setTimeout(resolve, 100));

      // メイン画像のsrcとaltを更新
      mainImg.src = img.src;
      mainImg.alt = img.alt;

      // メイン画像をフェードイン
      mainImg.style.opacity = 1;

      // サムネイルのis_activeクラスを更新
      thumbBtns.forEach(thumbBtn => thumbBtn.classList.remove('is_active'));
      this.classList.add('is_active');
    }
  }
});
const imgSwitcher = document.getElementById('js_imgSwitcher');
if (imgSwitcher)id="js_imgSwitcher"を取得して、その要素が存在しないページではエラーが出ないように条件分岐しています。
const mainImg = document.querySelector('.bl_imgSwitcher_main img');
const thumbBtns = document.querySelectorAll('.bl_imgSwitcher_btn');
// 初期設定(最初のサムネイルをメイン画像にセット)
mainImg.src = thumbBtns[0].querySelector('img').src;
mainImg.alt = thumbBtns[0].querySelector('img').alt;
thumbBtns[0].classList.add('is_active');メイン画像のimgと、全てのサムネイルのbutton要素を取得します。
その後、取得した1番目thumbBtns[0]のサムネイル情報(srcとalt)をメイン画像に設定。
最後に1番目のサムネイルに.is_activeクラスを付与して、半透明の黒背景を適用しています。
ここまでがページにアクセスした時の初期状態になります。
// サムネイルを選択した時の処理
thumbBtns.forEach(thumbBtn => {
  thumbBtn.addEventListener('click', switchImage);
  thumbBtn.addEventListener('focus', switchImage);
});サムネイルがクリックやフォーカスされたら、switchImage関数を実行します。
もしTabキーでサムネイルをフォーカスした時にメイン画像を自動で切り替えない場合は、thumbBtn.addEventListener('focus', switchImage);を削除してください。
/**
 * メイン画像を選択したサムネイル画像に切り替える関数
 * - メイン画像をフェードアウト
 * - 0.1秒待機してsrcとaltを変更
 * - メイン画像をフェードイン
 * - is_activeクラスを更新
 */
async function switchImage() {
  const img = this.querySelector('img');

  // メイン画像と同じサムネイルが選択された場合は何もしない
  if (mainImg.getAttribute('src') === img.getAttribute('src')) return;

  // メイン画像をフェードアウト
  mainImg.style.opacity = 0;

  // 0.1秒待機
  await new Promise(resolve => setTimeout(resolve, 100));

  // メイン画像のsrcとaltを更新
  mainImg.src = img.src;
  mainImg.alt = img.alt;

  // メイン画像をフェードイン
  mainImg.style.opacity = 1;

  // サムネイルのis_activeクラスを更新
  thumbBtns.forEach(thumbBtn => thumbBtn.classList.remove('is_active'));
  this.classList.add('is_active');
}
const img = this.querySelector('img');選択したサムネイルのimg要素を取得します。
// メイン画像と同じサムネイルが選択された場合は何もしない
if (mainImg.getAttribute('src') === img.getAttribute('src')) return;
現在表示されているメイン画像と同じサムネイルを選択した場合は処理をスキップします。
これにより無駄な処理を発生させないようにしています。
// メイン画像をフェードアウト
mainImg.style.opacity = 0;
メイン画像を非表示にします。
// 0.1秒待機
await new Promise(resolve => setTimeout(resolve, 100));
このコードは、メイン画像がフェードアウトした後に0.1秒待機し、次の処理を実行するためのものです。
通常のsetTimeoutでは、処理の完了を待たずに次のコードが実行されるため、awaitを使うことで「フェードアウトが完了してからsrcとaltを変更する」動作を保証しています。
この記述がないと、フェードアウトせずに画像がパッと切り替わってしまうため、フェードアウト後に0.1秒待機してから、メイン画像のsrcとaltを更新しています。
また、awaitを使用する際は関数の定義にasyncを付与することを忘れないでください。
// メイン画像のsrcとaltを更新
mainImg.src = img.src;
mainImg.alt = img.alt;
// メイン画像をフェードイン
mainImg.style.opacity = 1;
更新されたメイン画像を表示します。
thumbBtns.forEach(thumbBtn => thumbBtn.classList.remove('is_active'));
this.classList.add('is_active');すべてのサムネイルから.is_activeクラスを外し、選択されたサムネイルのみに付与します。
【2】まとめ

サムネイルの情報をメイン画像に適用して表示するシンプルな動作でしたが、もし前後矢印やドットなどが必要になる場合は、Splideなどのスライダーライブラリを採用するのが良いかと思います。
人気記事Webサイトにフォントサイズ変更ボタンを実装する方法(jQuery使用)
人気記事【脱jQuery】スクロールしたら画面上部に追従ヘッダーを表示する方法